Getting started
Open the Studio from the menu. You need no account to create and export an artwork: an account is only needed to save it, publish it and use the Inspire me assistant.
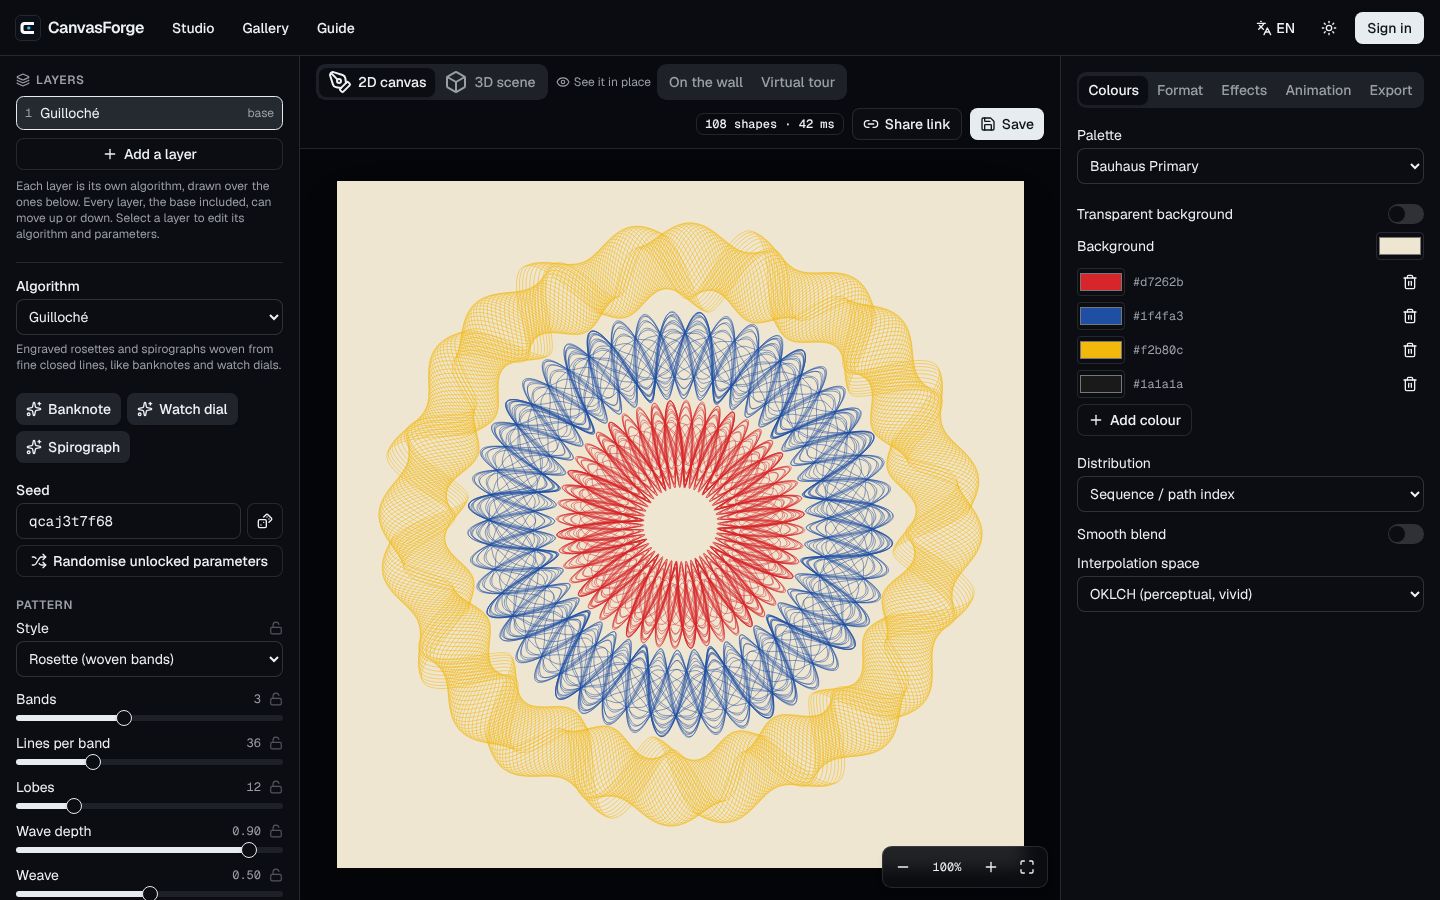
The Studio has three areas:
- on the left, the layers, the algorithm, its presets, the seed and its parameters;
- in the middle, the preview, with the Create modes (2D canvas, 3D scene, Drawing) and the See it in place modes (On the wall, Virtual tour);
- on the right, the Colours, Format, Effects, Animation and Export tabs.
For a first artwork:
- Pick an algorithm from the list. They are grouped into families: Lines & flows, Geometry & composition, Growth & simulation, Cells & dots, Image.
- Click a preset, such as "Coral" or "Topography", to start from settings that work.
- Change the seed (the new-seed button next to the field) until you like the composition.
- Pick a palette in the Colours tab, then a format in the Format tab.
- Export from the Export tab, or save the artwork if you are signed in.
The counter above the preview ("1,240 shapes · 85 ms") shows the size of the artwork and how long it took to compute.
Tuning an artwork: parameters, seed, presets
Each algorithm has its own parameters, grouped by theme (structure, stroke, colour…). The help line under a setting says what it changes.
- The seed fixes the randomness. The same seed with the same parameters always gives the same artwork. Another seed gives a different variant with the same character.
- Presets load a whole set of parameters in one click. You can then change anything.
- Randomise unlocked parameters draws new values for every parameter. Click a parameter's padlock to protect it: handy to keep a line weight or a density while you explore the rest.
- Share link copies an address that holds the whole artwork (algorithm, seed, parameters, palette, drawing). Anyone who opens it gets exactly the same artwork in their Studio.
Image Trace (Image family) starts from a photo: paste an https:// link to a picture you have the rights to, or upload one if you are signed in. An uploaded picture becomes public and permanent, so that the artwork stays reproducible: the upload window asks you to confirm.
Some algorithms are slow (Differential Growth or Grown Strokes, for instance): the Studio first shows a quick draft, then the full version once it is ready.
Colours
The Colours tab offers three ways to choose a palette:
- Curated: ready-made palettes such as Swiss Modernism, Bauhaus Primary, Ukiyo-e, Sumi-e Ink Wash or Thermal.
- Harmony generator (OKLCH): choose a rule (analogous, complementary, triadic, tetradic, monochromatic…), a base hue, chroma, lightness and contrast. Colours are computed in a perceptual space, so their steps look even to the eye.
- Custom: add, remove and edit each colour, with a weight per colour.
Then:
- Distribution decides how colours are assigned: drawing order, weighted probability, linear or radial gradient, noise field, shape area, or a value computed by the algorithm.
- Smooth blend interpolates between colours instead of making bands. Avoid it for a pen plotter, which can only draw with a finite set of pens.
- Transparent background paints no background: PNG and SVG exports keep the transparency.
Format and printing
The Format tab sets the physical canvas:
- Ratio: square, classic (4:3), photo (3:2), panoramic 2:1 or 3:1;
- Size: from 20 × 20 cm to 120 × 90 cm;
- Orientation: landscape or portrait.
The panel shows the size in millimetres and in pixels at 300 DPI. It warns you when a size goes beyond what a browser can handle. For example, Safari refuses images over 16.7 megapixels. In that case, export as SVG: it is lossless at any size.
Wall mockup sets the frame used by the "On the wall" and "Virtual tour" views: gallery wrap, black, white or oak frame, or a flat print.
Stacking layers
An artwork can stack up to four algorithms. In the Layers panel, click Add a layer, then select a layer to choose its algorithm and tune its parameters. The arrows move a layer up or down, the base included.
For each layer, you set how it sits on the ones below:
- Opacity and Blend (normal, multiply, screen, overlay, darken, lighten);
- Scale, horizontal and vertical offset, Rotation;
- Mask: draw only inside or only outside the filled shapes of the layers below, or of your hand-drawn shapes (see the Drawing section);
- Interaction: some algorithms (curl noise flow, Voronoi stippling, orbs) can avoid the shapes below and flow around them;
- Colours: the artwork's palette, or a palette of the layer's own.
Tip: give each layer a role (ground, figure, texture, accent), and avoid stacking two very dense algorithms.
Drawing by hand
Five algorithms start from a hand drawing: Combed Flow, Echoes & Ripples, Drawn Hatching, Generative Calligraphy and Grown Strokes (Lines & flows family). When one of them is selected, the Drawing tab appears next to 2D canvas and 3D scene. Without a drawing, a sample sketch guides the algorithm.
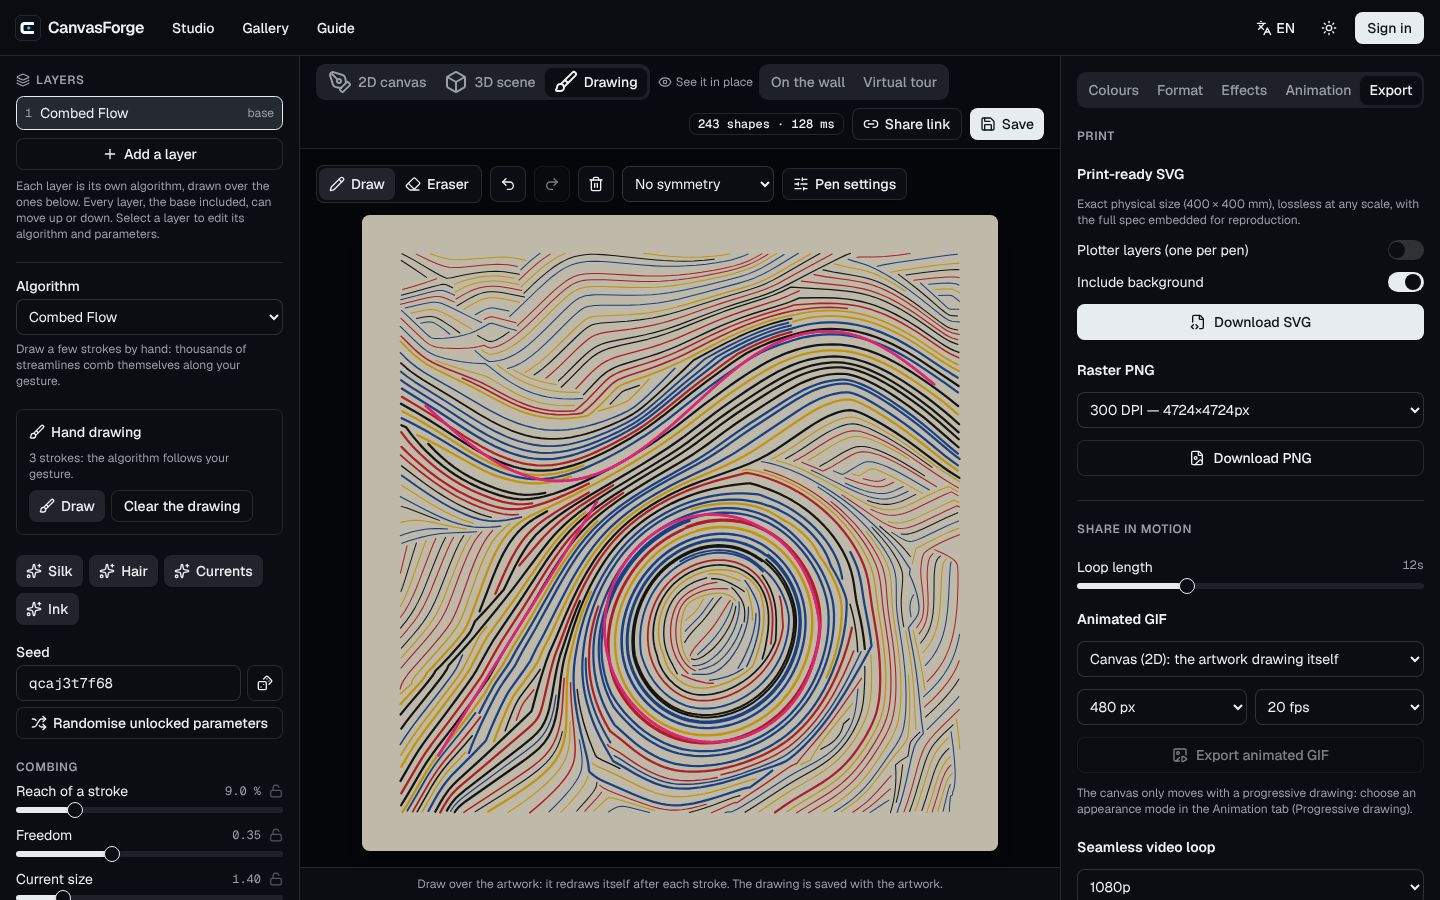
Drawing
- Draw with a mouse, a finger or a stylus, right over the artwork: it redraws after each stroke.
- Draw and Eraser (the eraser removes a whole stroke), Undo / Redo, and the bin to clear everything.
- Symmetry: mirror, rotation × 4 or × 6, kaleidoscope × 12.
- Pen settings:
- Stabilisation absorbs hand tremor, at the cost of a slight lag;
- Smoothing sets how far the stored curve may stray from your gesture;
- Width and Width follows pressure, if your stylus reports pressure;
- Stylus only ignores fingers and palm, so you can rest your hand on a tablet.
The drawing is saved with the artwork, as smooth Bézier curves with the pressure. It keeps its proportions if you change the format.
What each algorithm does
- Combed Flow: thousands of lines line up along your strokes, like a comb through hair. Reach of a stroke and Freedom set how far they follow you.
- Echoes & Ripples: contour lines around your strokes, like a topographic map, or interfering waves. Silence far away erases the faint waves far from the strokes.
- Drawn Hatching: an engraving whose cross-hatching darkens near your strokes (Shadow mode) or around them (Halo mode).
- Generative Calligraphy: each stroke re-inked with a broad nib (thicks and thins from the nib angle), a brush (from the pressure) or a dry brush, with pooling ink, spatter and copies. The Lines rendering suits plotters.
- Grown Strokes: your strokes lengthen and fold like coral. Their ends stay pinned where you drew them.
Closed shapes as masks
A stroke that ends near where it began becomes a shape. In a layer's settings, the "Only inside my drawn shapes" or "Only outside my drawn shapes" mask cuts any layer, whatever its algorithm, the bottom layer included. You need at least two layers. If your drawing has no closed shape yet, the panel says so and offers Draw shapes.
Effects
The Effects tab adds character. Looks (Risograph, Hand-drawn, Liquid, Neon, Vintage print, Pop shadow) combine several effects in one click.
- Shape effects: hand-drawn wobble, liquid warp, misregistration, inked outline, drop shadow. They change the drawing itself, so they show everywhere: canvas, 3D and every export, the plotter SVG included.
- Surface filters: grain, glow, chromatic aberration, vignette. They are exported as SVG filters and applied to PNG and WebGL exports, but the plotter SVG and the Blender model ignore them.
With several layers, Apply to lets you keep shape effects to one layer.
Seeing it in 3D, on a wall and in a gallery
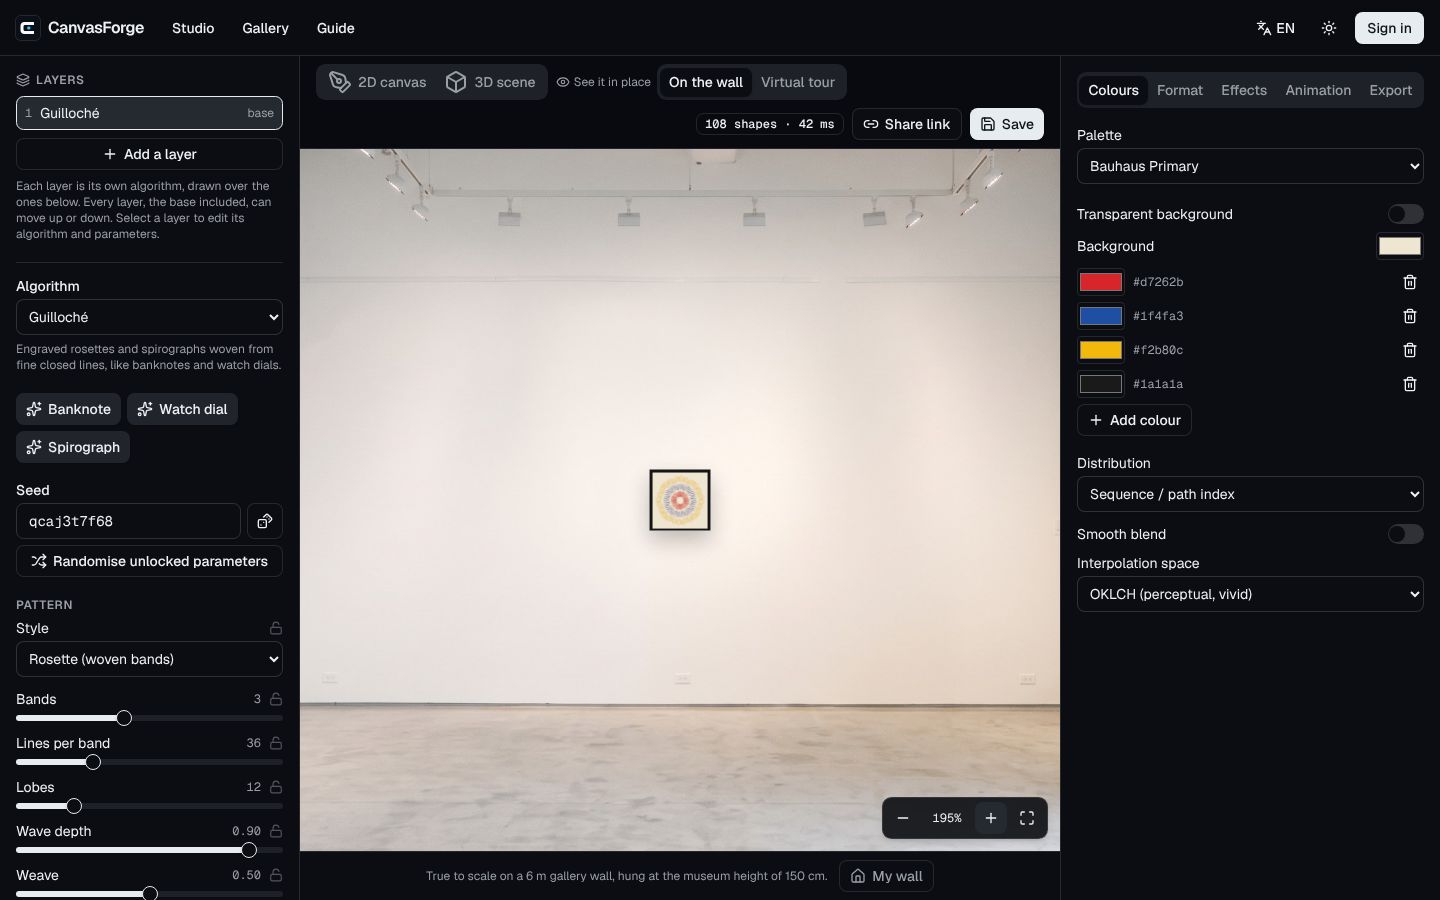
- 2D canvas: the artwork flat, as printed. Zoom in to inspect the details.
- 3D scene: the artwork in relief, to turn around. Shapes can get a thickness, circles can become spheres and, for some algorithms, drawn cubes become real volumes.
- On the wall: the artwork at true scale on a 6 m gallery wall, hung at 150 cm, the museum height, with the frame chosen in the Format tab.
- My wall (signed-in accounts), in the On the wall view: take a photo of a wall in your home, or import one. Stand right in front of the wall, phone upright, and if you can include the floor line and an object of known size (a door, a power socket, a light switch). Claude (Anthropic) checks that the wall faces the camera, estimates its width, the floor line and a free spot, and the artwork is hung there at its true size. The estimate is approximate: correct it with the sliders if needed. The photo stays in your browser; CanvasForge does not keep it.
- Virtual tour: walk through a 6 × 9 m room. Click in the view, then move with W A S D (or Z Q S D) or the arrow keys; drag to look around; the wheel brings you closer; Shift walks faster. Four lighting choices: track spot, two projectors, picture light, ceiling.
Animating
The Animation tab sets the artwork in motion. Start it with Play animation.
- Progressive drawing: the artwork draws itself before your eyes, on the 2D canvas as in 3D. Shapes can appear one by one, traced along their path, as a sweep, a cascade, from the centre outwards or as a random dissolve, in a loop or rewinding.
- In the 3D scene: camera moves (sway, orbit, fly-by, spiral, raking light, dive into a detail, figure of eight, low angle, hand-held), pointer parallax (off by default), relief and waves, volumes, colour cycling, an orbiting light.
- A background image and background music to import. The scene can react to the music, to ambient sound (microphone) or to your face (webcam).
Images, music, microphone and webcam stay in your browser: nothing is sent to CanvasForge. Sound and webcam frames are analysed on the spot, never recorded.
Exporting
The Export tab gathers every file.
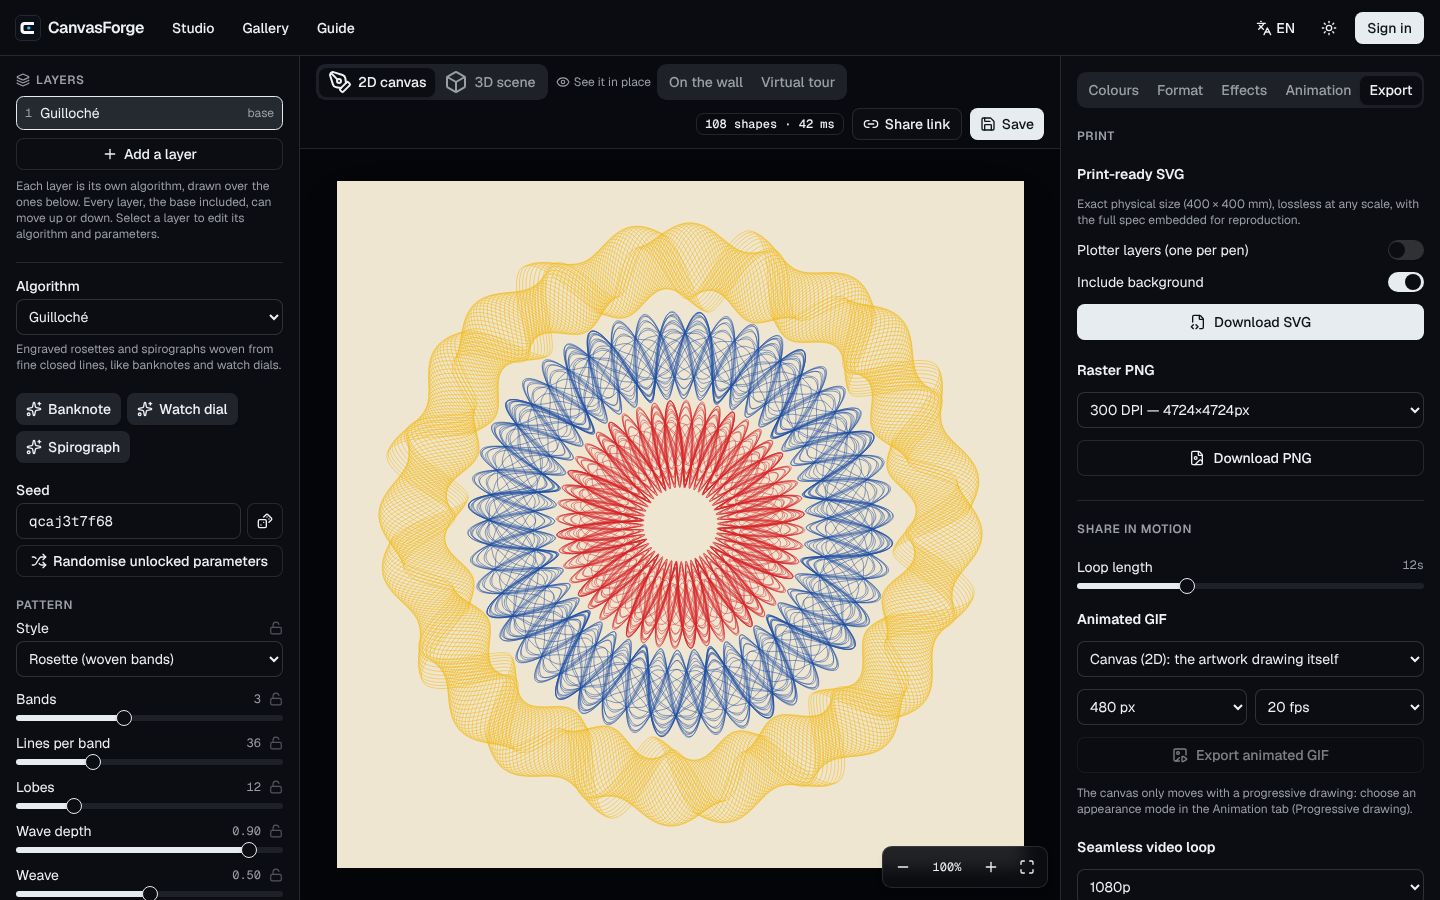
- Print-ready SVG: the exact physical size in millimetres, lossless at any scale, with the artwork's settings embedded to reproduce it.
- Plotter layers (one per pen): one Inkscape layer per colour, ready for a plotter.
- Include background: adds the background colour or not.
- Raster PNG: up to 300 DPI. For very large formats, prefer the SVG.
Share in motion
- Animated GIF: a loop of the canvas drawing itself (pick a Progressive drawing mode first) or of the 3D view.
- Seamless video loop: a video that loops without a seam, if your browser can record video.
3D
- 3D view export as SVG or PNG, frozen from your camera.
- Blender 3D model (.glb): import it in Blender (File → Import → glTF 2.0), at true size.
- Standalone WebGL (.html): an interactive page that opens in any browser, with the animation, background image and music if you include them.
Data: the artwork's JSON spec.
Inspire me: creating with the assistant
Inspire me is an AI assistant for signed-in accounts. Describe the artwork you have in mind, as a feeling ("a sad piece about how hard life is") or as images ("waves for the sea, circles for joy"). The assistant picks the algorithms, layers, settings and palette, then shows its proposal on the canvas.
- Reply to refine it: "calmer", "less red", "add a layer of dots"…
- Show the assistant the current canvas lets it see the render and fix what doesn't work.
- Restore my work from before brings back the artwork you had before its proposal.
- When you save, it can draft the title and description from your conversation. You can edit them freely.
The assistant does not propose the drawing algorithms, which need your own gesture.
Saving, editing, publishing
Sign in with Google or by e-mail (magic link or password). Then click Save above the preview:
- give a title and a description. The AI can suggest both;
- tick Public to show the artwork in the gallery and on your profile, or keep it private;
- choose the image in the gallery: the flat canvas, or the current 3D view.
Only the seed and parameters are stored: the artwork is regenerated identically. Your account has a maximum number of saved artworks, shown in the save window and in your workshop.
From an artwork's page
- Edit (your own artworks) reopens the Studio on the artwork. Your changes replace the saved artwork, keeping its address, likes, comments and views.
- Clone copies a public artwork into your portfolio, with its title and description, credited as a remix. It stays private until you publish it.
- Open in Studio starts a new artwork from it.
- You can also like an artwork and comment on it.
My workshop, profile and 3D tour
My workshop, in the menu once you are signed in, gathers:
- your artworks, public or private, with their views and likes, to open, edit or delete them;
- your profile: username (your public address is /u/your-name), display name and bio;
- Accept messages from visitors: collectors can write to you from your profile. Messages are relayed to your e-mail, which is never shown;
- Public 3D virtual tour: all your public artworks hung at their true size in a suite of rooms, with labels and a choice of lighting. When on, anyone with the link can walk through it. When off, only you can open it. The 3D virtual tour button is on your profile and in your workshop;
- AI tools (MCP): access tokens to use CanvasForge from Claude or another MCP client (create, save, export). Copy a token as soon as you create it: it won't be shown again.
In the tour, move as in the single-artwork tour. Click an artwork to walk up to it, or use Previous / Next. Doorways lead to the next rooms.
Tips and troubleshooting
- "The scene is too dense": lower the density parameters (number of lines, cells, iterations…).
- PNG export fails at a large size: your browser limits image sizes. Lower the DPI or export as SVG.
- 3D views unavailable: they need WebGL. Try a recent browser, or turn on hardware acceleration.
- Pen plotter: pick a palette of distinct colours, turn off Smooth blend, export with Plotter layers, and prefer line renderings (Generative Calligraphy's Lines rendering, for instance).
- Finding an artwork again: keep its share link. It holds every setting, even without an account.
- The drawing doesn't respond to your stylus as expected: turn on Stylus only in the Pen settings and adjust the Stabilisation.
A question, a bug or an idea? Write to us from the Contact page.